Warning
This documentation will no longer be mantained. The official FARGO3D repository is now https://github.com/FARGO3D/fargo3d, and the documentation is https://fargo3d.github.io/documentation/
First Steps
Getting FARGO3D
FARGO3D can be downloaded from the same webpage as the public FARGO code (http://fargo.in2p3.fr). In that page, you will find a tar.gz file, with all the sources inside. You can check the README file which contains some basic installation tips. Hereafter is a set of detailed instructions. If you have trouble at some stage, read the troubleshooting first, and if your problem is not solved you may send an email to the discussion group, asking for help.
Installing
Warning
This document was written for UNIX-type systems. We have not tested the behavior of FARGO3D on a Windows system.
Suppose you have downloaded the code to your download directory (USER_PATH/downloads), where USER_PATH is the path to your user (eg: /home/pablo/downloads/). You need to decide where you want to install FARGO3D. We assume in the following that you install it in the directory USER_PATH/fargo3d. In order to do that, the steps are:
$: cd USER_PATH (or simply: 'cd')
$: cp USER_PATH/downloads/fargo3d.tar.gz USER_PATH/
$: tar -xvf fargo3d.tar.gz
If all went fine, you will see directories called bin, src, outputs, setups, etc:
:USER_PATH/fargo3d/$ ls
bin  doc  Makefile  outputs  planets README  scripts  setups  src  std  test_suite  utils
You are now ready to build the code and do your first run.
First run
The first run of FARGO3D is the same first run as the one of its
ancestor FARGO (you can see the documentation of FARGO for
details). In order to build the code, go to the USER_PATH/fargo3d
directory (not the src/ directory !) and issue:
$: make
Warning
You must use the GNU make utility. The build process relies upon several important features of the GNU make. We have tested the compilation process with GNU Make 3.81. We have thoroughly tested the build process with python version 2.7. It may work with older versions of Python too. However, should you experience unexpected results during the build process with an older version of python, we recommend that you update it to 2.7.x <= python version < 3. Issue python -V at the command line to know your version. No additional libraries are required for this simple first build.
With this instruction, you will have a sequential (or serial) version of the binary (ie, without MPI), meant to run on one CPU core only. By default, this sequential version cannot run on a GPU. After the building process, you will see a message similar to:
          FARGO3D SUMMARY:
          ===============

This built is SEQUENTIAL. Use "make para" to change that


SETUP:      'fargo'
(Use "make SETUP=[valid_setup_string]" to change set up)
(Use "make list" to see the list of setups implemented)
(Use "make info" to see the current sticky build options)
We will go through the details of this note in the next sections, but for now, the important thing is that the code was compiled in SEQUENTIAL mode, and the SETUP is ‘fargo’. This means that the code was compiled in a mode that is very similar to the FARGO code. Actually, the first run of FARGO3D is the same first run of FARGO (A Jupiter like planet embedded in a 2D cylindrical gas disk).
Warning
A note to former FARGO users: the setup must not be confused with the parameter file. The setup is chosen at build time, and contains fundamental information about the executable produced (MHD on or off, mesh geometry, equation of state used, number of dimensions, etc.) An executable build for a given setup can then be run on as many parameter files as required, without any rebuild.
If you have a look at the content of the main directory, you will see that after the compilation a new file has been created, called ‘fargo3d’. This file is the binary file. We can now perform the first run:
$: ./fargo3d setups/fargo/fargo.par
And you will see the following lines:
x = 1.0000000000     y = 0.0000000000        z = 0.0000000000
vx = -0.0000000000   vy = 1.0004998751       vz = 0.0000000000
Non-accreting.
Doesn't feel the disk potential
Doesn't feel the other planets potential

Found 0 communicators
OUTPUTS 0 at date t = 0.000000 OK
TotalMass = 0.0121800000
.............
................
.................
...................
...................
.....................
..................
...................
All right, all works fine. These lines should look familiar to former
FARGO users All the outputs are written to outputs/fargo. You can
now open it with your favorite data reduction software. We include in
the following some examples of how to visualize this first data. We
will assume that you run the test at least until the output 10.
Note: For all the instructions, it is assumed you are in
outputs/fargo directory. You may go to this directory by issuing
cd outputs/fargo from the USER_PATH.
Gnuplot
Gnuplot (http://www.gnuplot.info/) is a portable command-line driven graphing utility, and it is a useful tool for showing the outputs of FARGO3D. Here you have an example on how to load the outputs of FARGO3D on our two-dimensional first run.
The command line should be similar to:
$: gnuplot
Version 4.6 patchlevel 1    last modified 2012-09-26
.
.
.
gnuplot> set palette rgbformulae 34,35,36
gnuplot> set logscale cb
gnuplot> nx = 384; ny = 128
gnuplot> plot[0:nx-1][0:ny-1] "./gasdens10.dat" binary array=(nx,ny) format="%lf"
         with image notitle
and you should see an image similar to:
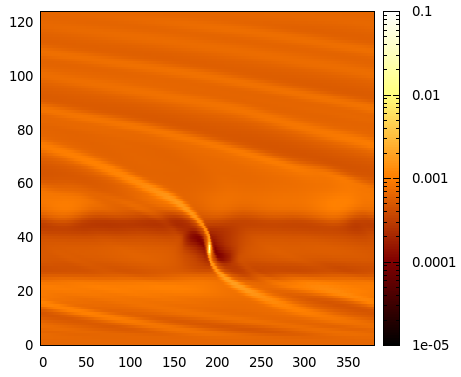
Gnuplot image of the first run (gas surface density), output number 10.
GDL/IDL
GDL (GNU Data Language - http://gnudatalanguage.sourceforge.net/) is an open-source package similar to IDL, but it is free and has similar functions. The command line should be similar to:
$: gdl
  GDL - GNU Data Language, Version 0.9.2
.
.
.
GDL> openr, 10, 'gasdens10.dat'
GDL> nx = 384
GDL> ny = 128
GDL> rho = dblarr(nx,ny)
GDL> readu, 10, rho
GDL> rho = rebin(rho, 2*nx, 2*ny)
GDL> size = size(rho)
GDL> window, xsize=size[1], ysize=size[2]
GDL> tvscl, alog10(rho)
and you should see an image similar to:

GDL image of the first run (gas surface density), output number 10.
Python
Python (http://www.python.org/) is one of the most promising tool for data analysis in the scientific community. The main advantages of Python are the simplicity of the language and the number of external libraries. Data reduction of FARGO3D data is straightforward with the numpy package (http://www.numpy.org/). Also, making plots is extremely easy with the help of the matplotlib package (http://matplotlib.org/). We recommend using the interactive python-shell called IPython (http://ipython.org/).
Here, you have an example of how to visualize data in an interactive IPython shell:
$: ipython --pylab
  IPython 1.0.0 -- An enhanced Interactive Python.
.
.
.
In [1]: rho = fromfile("gasdens10.dat").reshape(128,384)
In [2]: imshow(log10(rho),origin='lower',cmap=cm.Oranges_r,aspect='auto')
In [3]: colorbar()
You should see an image similar to (inside a widget):
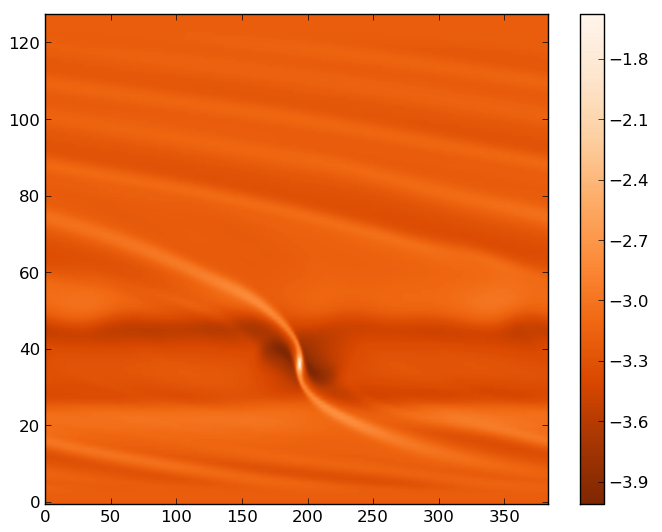
Matplotlib image of the first run, output number 10.
More tools
The is a lot of software for reading and plotting data but, in general, you need an ASCII file with the data. In the utils directory, you will find some examples of how to transform the data into a human-readable format, written in different languages. If you are working with a large data set, this option is not recommended. It is always a good choice to work with binary files, your outputs are lighter and the reading process is much faster.
Warning
Using ASCII format is very slow and should never be used for high resolution simulations or a 3D run.
Note that FARGO3D can also produce data in the VTK format, which can be inspected with software such as VISIT. This feature of FARGO3D will be entertained later in this manual.
First parallel run
Until now, we did not need external libraries to compile the code, but if we want to build a parallel version of the code, we must have a flavor of MPI libraries on our system.
Note
FARGO3D was successfully tested with:
OpenMPI 1.6/1.7
MPICH2/3
MVAPICH2 2.0
with a similar overall performance for the CPU version of the code.
As we do not use any version-dependent features of MPI, we expect the code to work with any version of MPI. There are however some special features of MVAPICH 2.0 and OpenMPI 1.7 related to CUDA interoperability that are discussed later in this manual, and that are useful exclusively for GPU builds.
If you are running on a standard Linux installation, with a standard working MPI distribution, you have to issue:
$: make PARALLEL=1
or the corresponding shortcut:
$: make para
At the end of the process, you will see a message, telling you that the compilation was performed in parallel. Now, you can run the code in parallel:
$: mpirun -np 4 ./fargo3d setups/fargo/fargo.par
If your computer have at least four physical cores, you should see a speed-up of a factor ~4.
Note
Open-MPI-Installation on Ubuntu systems. If you have Ubuntu, these lines install a functional version of OpenMPI:
$: sudo apt-get install openmpi-bin
$: sudo apt-get install openmpi-common
$: sudo apt-get install libopenmpi-dev
You must accept all the installation requirements. This process is similar on other Linux-systems with a package manager. Similar packages exist for MPICH.
First GPU run
Warning
We assume you have installed CUDA and the proper driver on your
system. You can test if the driver works correctly by running
nvidia-smi in a terminal. It is also a good idea to run a few
examples of the NVIDIA suite to ensure that your installation is
fully functional.
Running FARGO3D in GPU mode is similar to the first parallel run. The
only important thing is to know where CUDA is installed. FARGO3D knows
about CUDA by the environment variable CUDA defined in your
system. If you do not have the CUDA variable defined, FARGO3D
assumes that the default path where CUDA is installed is
/usr/local/cuda. If this is not the right place, modify your
.bashrc file and add the following line:
``export CUDA=Your CUDA directory``
Warning
The above example assumes that you use the bash shell.
After that, we are ready to compile the code:
$: make PARALLEL=0 GPU=1
or the corresponding shortcut:
$: make PARALLEL=0 gpu
Warning
you cannot combine shortcuts in the command line. You
could for instance issue make seq GPU=1 instead of
the instruction above (seq stands for
PARALLEL=0), but make seq gpu would fail.
Note
Additional information
We assume here that you followed the whole sequence of
examples of this page, so that your previous run was a
parallel CPU run. Build options (such as PARALLEL=1) are
sticky, so that they are remembered from build to build
until their value is explicitly changed. Since we want here
a sequential built for one GPU, we need to explicitly
reset the value of PARALLEL to zero.
Another option is to issue:
make mrproper
which resets all sticky built options to their default values, and after that issue:
make gpu
You will see at the end of the building process the message:
          FARGO3D SUMMARY:
          ===============

This built is SEQUENTIAL. Use "make para" to change that

This built can be launched on
a CPU with a GPU card (1 GPU only).


SETUP:      'fargo'
(Use "make SETUP=[valid_setup_string]" to change set up)
(Use "make list" to see the list of setups implemented)
(Use "make info" to see the current sticky build options)
telling you that the build is sequential and should be run on a GPU. To run it, simply type:
$: ./fargo3d setups/fargo/fargo.par
Before the initialization of the arrays, you will see a block similar to:
=========================
PROCESS NUMBER       0
RUNNING ON DEVICE Nº 0
GEFORCE GT 520
COMPUTE CAPABILITY: 2.1
VIDEO RAM MEMORY: 1 GB
=========================
It is the information about the graphics card used by FARGO3D. If you see some strange indications in these lines (weird symbols, an unreasonable amount of memory, etc), it is likely that something went wrong. The most common error is a bad device auto-selection.
Warning
In the jargon of GPU computing, the device is the name for a given GPU. We shall use indistinctly these two terms throughout this manual.
If you need to know the index of your device, you can use the nvidia-smi monitoring software:
$: nvidia-smi
You may then explicitly specify this device on the command line (here e.g. 0):
$./fargo3d -D 0 setups/fargo/fargo.par
In general, expensive cards support detailed monitoring, but at least, the memory consumption will be given even for the cheapest ones. Also, you can check the temperature of your device. An increasing temperature is a good indication that FARGO3D is running on the desired device.
Note
Useful comments
Note 1:
If you cannot run on a GPU after reading the above instructions,
you should try to check the index of your device (normally it is 0
is you have only one graphics card) with nvidia-smi:
   $: nvidia-smi

   +------------------------------------------------------+
   | NVIDIA-SMI 4.310.44   Driver Version: 310.44         |
   |-------------------------------+----------------------+----------------------+
   | GPU  Name                     | Bus-Id        Disp.  | Volatile Uncorr. ECC |
   | Fan  Temp  Perf  Pwr:Usage/Cap| Memory-Usage         | GPU-Util  Compute M. |
   |===============================+======================+======================|
   |   0  GeForce GT 520           | 0000:01:00.0     N/A |                  N/A |
   | 40%   37C  N/A     N/A /  N/A |  18%  182MB / 1023MB |     N/A      Default |
   +-------------------------------+----------------------+----------------------+

   +-----------------------------------------------------------------------------+
   | Compute processes:                                               GPU Memory |
   |  GPU       PID  Process name                                     Usage      |
   |=============================================================================|
   |    0            Not Supported                                               |
   +-----------------------------------------------------------------------------+


And the number of the GPU, in this case, is 0. So, you could try to run FARGO3D forcing the execution on the device 0::

  $: ./fargo3d -D 0 setups/fargo/fargo.par
Note 2:
We have used two sticky flags: PARALLEL and GPU, and after
a while you may wish to know which ones are activated. In order to
know the current status of the executable, issue:
$: make info

Current sticky build options:

PROFILING=0
RESCALE=0
SETUP=fargo
PARALLEL=0
FARGO_DISPLAY=NONE
FULLDEBUG=0
UNITS=0
GPU=1
DEBUG=0
MPICUDA=0
BIGMEM=0
You will see the meaning of each flag later on in this manual.
All the information about how to open and visualize your fields is still valid. While the computation was done on the GPU, all necessary data transfers were run in a transparent manner from the GPU to the CPU before a write to the disk. For you, nothing changes, except the execution speed.
First Parallel GPU run
The same ideas as before can be used for running FARGO3D on multiple
GPUs. But we cannot give a set of instructions because they are
cluster-dependent. In the next sections, you will learn how to run
FARGO3D on a large cluster and have each process select adequately its
device, according to your configuration. When you know how to work
with the internal SelectDevice() function, you will be able to work with
FARGO3D on a cluster of GPUs.
You could try to run with MPI over one GPU. Of course, it is a bad idea for performance reasons, but it shows if all the parallel machinery inside FARGO3D works. (Actually, for developing an MPI-CUDA code, you do not need more than one thread and one GPU card!).
Try the following:
$: make mrproper
$: make PARALLEL=1 gpu
$: mpirun -np 2 ./fargo3d setups/fargo/fargo.par
If all goes fine, that is to say, if the output looks correct, FARGO3D is working with MPI and GPUs. The next step is to configure it to run on a cluster of GPUs, using as many different GPUs as possible. We will learn how to do that later on in this manual